Those working with injection molding will agree that the key to success lies in the minute details; and such is the case of draft angle which is hardly noticed. Most designers give a lot of attention to the part’s function and appearance but the technical detail of draft angle usually gets sidelined.
At Montrose Molders Corp, we quite often witness that this seemingly insignificant design element is actually the deciding factor of a project. Regardless of whether you are an experienced engineer or just getting to know plastics manufacturing, it is very important to understand draft angles if you want to have continuous production and minimize your expenses.
What Exactly is a Draft Angle?
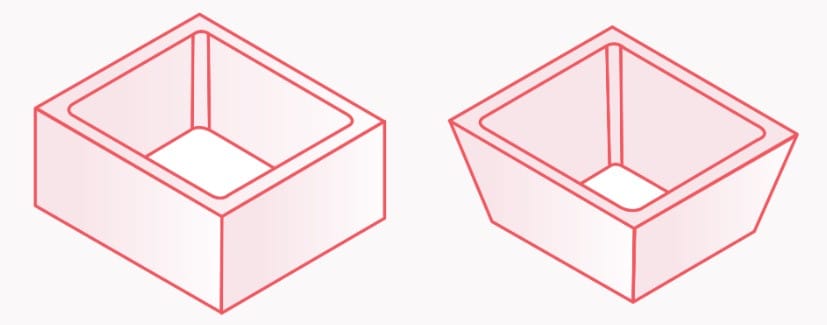
Imagine trying to take a square ice cube out of a tray with straight walls. It would probably stick, wouldn’t it? Now, think about a plastic cup. Since the walls are slightly tapered (the top is a bit wider than the bottom), you can easily pop the cup out. Well, that taper is what we call the draft angle. In simpler words, a draft angle is the slight tilt we give to the vertical walls of a part made by injection molding.
So, instead of the walls being exactly 90 degrees, we angle them a bit. This makes sure that when the mold is opened and the part starts to move, a small space is created between the plastic and the metal tool, which allows the part to come out without any problem.
Why Draft Angles Are Non-Negotiable
Disregarding draft angles does not only make things “a bit tough”it may bring about a complete stoppage of manufacturing. Here is why, in fact, they are a matter of concern:
- Smooth Part Ejection
At the moment a mold is being separated, the plastic part is required to be “ejected” or forced out. In the case of straight walls, the plastic holds on to the mold surface as if it’s sealed by a suction cup. Appropriate draft angles will instantly break this seal.
- Result: You get faster production cycles and less mechanical stress on your equipment.
- Flawless Surface Quality
Without a draft angle, the part will be dragged against the metal mold as it is being ejected. This friction leads to the appearance of visible scratches, scuff marks, and “drag lines” that negatively affect the product’s appearance.
- Result: Your parts will look exactly as expected with no visible defects.
- Protecting Your Investment (Tool Life)
Injection molds are a major investment. When parts stick or generate a lot of friction, they cause wear on the mold’s internal surfaces. Eventually, this will result in expensive repairs and the tool having a shorter lifespan.
- Result: Suitable draft will shield your mold and will also cost you less for maintenance eventually.
- Shorter Cycle Times
Manufacturing time is equivalent to money. When a part is sticking, the machine may have to operate at a slower speed, or the operator may have to step in manually.
- Result: Parts which eject effortlessly will enable the machine to operate at maximum speed, thereby reducing your cost per part.
Real-World Applications
How much draft do you really require? Although each project stands alone, here are some general rules of thumb:
- Standard Vertical Walls: Typically, 1 per side is the minimum for draft. Still, 1. 5 or 2 will give a bigger margin of safety for most cases.
- Textured Surfaces: When your part has a type of leather texture or a dull surface, sufficient “standing” layer is needed to make it release smoothly. Our standard recommendation is minimum 3, and this is further increased with the pattern depth.
- Deep Cavities and Ribs: When there are tall figures or narrow support ribs, one needs to add more draft to keep the plastic from clinging so hard to the mold core that it becomes stuck.
4 Common Mistakes to Avoid
- The “Zero Draft” Mistake: Making walls exactly 90 degrees is the surest way to create a “stuck part” situation.
- Neglecting Texture Production: Putting a heavy texture on a component and still using a regular 1 draft is pretty much guaranteed to cause ejection surface damage.
- Ignoring Inner Components: It is typical for designers to think only about the outer shell and forget the internal “bosses” (screw holes) and ribs. These can get stuck just as easily also. 4. Last Minute Decision: Attempting to insert draft once the mold has been physically made. Modifying a mold costs a whole lot more than simply tweaking a digital 3D model.
The True Cost of “Getting It Wrong”
When draft is not considered, the so-called “hidden costs” can accumulate very quickly:
- High Scrap Rates: You are forced to discard parts that have scratches or other damages.
- Production Delays: The completion of the project is longer due to the inconsistency of the molding process.
- Presentation of Expensive Rework: It is possible that you end up paying for “tooling modifications” simply to be able to grind or weld the mold to add the necessary angles.
In practically every instance, a minor change to the design at the stage of planning would have saved all this trouble that we are facing now.
Best Practices for Success
Keeping these tips handy will definitely help you have a smooth project, staying on schedule without last-minute rush:
- Start Early: Incorporate the draft in your 3D modeling work from the initial version itself.
- Know Your Material: Certain kinds of plastic have a higher shrinkage rate – this in turn influences how easily they come out.
- Talk to Your Molder: This is the most crucial step. Even a brief discussion with your manufacturing partner can help to identify draft problems that might eventually become “real world” issues.
Final Thoughts
Draft angles can be unnoticed as a small detail of the technicality, but in reality, they are what make the bed for a high-quality, cost-effective part. When you make draft a priority in your design, you are not only protecting your tooling but also making your products more attractive and manufacturing becoming much more enjoyable.
Are you thinking of designing a product? In case you are, make sure you don’t let the draft be a matter of luck. At Montrose Molders Corp, we are experts in Design for Manufacturability (DFM). We will assist you in analyzing your parts to make sure they are configured to give you the best results possible. Get in touch with us for a design review!